Add Bubble Comments Count in Blogger Post Title

This tutorial will add comments bubble icons to each of your post titles displaying the total count of the comments for that post. You have to add a simple code in your blog Template code, you will be able to see this beautiful in your blog.
Steps to add bubble comments count:
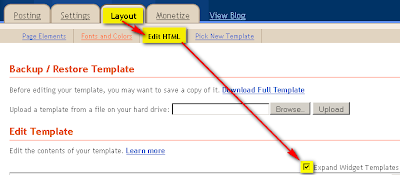
STEP #1: Log in to your blogger “Dash Board”. Navigate to Layout > Edit HTML section and a give tick to “Expand widget Template”.

STEP #2:
Find ]]></b:skin> in your template code and place the below code just before ]]></b:skin>
.comment-bubble {
     float : right;
     width : 48px;
     height : 48px;
     background : url(https://blogger.googleusercontent.com/img/b/R29vZ2xl/AVvXsEjTUeFZ7MvrbvVoKI7uNOChEcaxba3021vpUW26rgKjFi9NVWqIw8WIPeyeUy-32LkE-a4DLBCRarorUg9j6UVvp0BpAk3M_7xsNyAq__ImDJQu7m_xJJ3ztuXIvePYIqzi8elNkcJPVCK9/s1600/Comment+Bubble+%2815%29.png) no-repeat;
     font-size : 18px;
     margin-top : -15px;
     margin-right : 2px;
     text-align : center;
     position:absolute;
     }
Note: To Align bubble image right of the title remove position:absolute; line from #step 2 code.
Now find the below code and add the red code inside the code.
<b:includable id='post' var='post'>
<div class='post hentry uncustomized-post-template'>
<a expr:name='data:post.id'/>
<b:if cond='data:post.title'>
<h3 class='post-title entry-title'><b:if cond='data:post.allowComments'>
<a class='comment-bubble' expr:href='data:post.addCommentUrl' expr:onclick='data:post.addCommentOnclick'><data:post.numComments/></a>
</b:if>
<b:if cond='data:post.link'>
<a expr:href='data:post.link'><data:post.title/></a>
<b:else/>
<b:if cond='data:post.url'>
<a expr:href='data:post.url'><data:post.title/></a>
<b:else/>
<data:post.title/>
</b:if>
</b:if>
</h3>
</b:if>
Now click on Preview button and have a look at your post first, if every thing is correct then save template and done. Instead of adding the above image, you can add your own image or you can choose one of the image given below.
IMPORTANT:
You may use any image instead of the one linked in the code above (STEP #2), but you have to mention its dimensions correctly (width and height) for correct placement of numbers on the image.
Thanks alot Good Luck


Its a very informative post, i read it a found new useful stuff that is very useful for me.
ReplyDeletewebsite design
I like it, thanks for the important information and useful for everyone Home Agent
ReplyDelete